Advanced
Custom Servers
DL2CC-REMOTE-CW uses our servers for WebRTC signaling and, if needed, as a relay fallback. If you prefer to use your own infrastructure, DL2CC-REMOTE-CW can also work with compatible services.
Enable Use Custom Servers on the Advanced tab in Settings → Settings (see the screenshot above), then create the override file below with your server details. Any fields left empty fall back to the built-in defaults — so you can do a partial override.
supabaseUrl and supabaseAnonKey from the file and supply
only the turnServers and TURN authentication fields.
The built-in Supabase signaling is kept; only the TURN relay is replaced.
Override File
| Field | Description |
|---|---|
supabaseUrl | Your Supabase project URL (signaling backend) |
supabaseAnonKey | Supabase anon/public key |
stunServers | Array of STUN server URLs |
turnServers | Array of TURN server URLs |
turnAuthMode | TurnStaticCredentials (username/password) or TurnRestHmac (HMAC secret) |
turnUsername / turnPassword | Static TURN credentials (TurnStaticCredentials mode) |
turnRestSecret | HMAC shared secret (TurnRestHmac mode) |
turnCredentialLifetimeSeconds | TURN credential lifetime (default: 3600) |
Example
{
  "supabaseUrl": "https://your-project.supabase.co",
  "supabaseAnonKey": "eyJhbGciOi...yourAnonKey...",
  "stunServers": ["stun:stun.example.net:3478"],
  "turnServers": [
    "turn:turn.example.net:3478?transport=udp",
    "turns:turn.example.net:443?transport=tcp"
  ],
  "turnAuthMode": "TurnStaticCredentials",
  "turnUsername": "yourUser",
  "turnPassword": "yourPassword",
  "turnRestSecret": "",
  "turnCredentialLifetimeSeconds": 3600
}
Custom server configuration applies to the WebRTC signaling channel and TURN relay only. The licensing backend is always handled by our servers and cannot be redirected via this setting.
If the licensing server should ever become unresponsive, it has no effect on your license — it will still work and does not expire.
Network Ports
When you use the Remote Station, several of its
integration features open local network ports on your PC so that other programs —
your logger, a Hamlib application, WaveLog, or PSTRotator — can talk to DL2CC-REMOTE-CW.
By default these bind to loopback (127.0.0.1), so they are
reachable only from the same PC and are never exposed to the internet.
You normally never need to think about these. The table is here for the rare cases where a port number clashes with another program, or your firewall/antivirus blocks a local connection. Most ports are adjustable in Remote Station → Settings; a few are fixed.
localhost (the default) to keep them PC-local, or pick one of your PC's
LAN addresses to let another computer on your network connect to them. The
WaveLog Gateway endpoints (54321 / 54322) are the exception —
they are always fixed to loopback.
Host side (the PC at the radio)
On the host, DL2CC-REMOTE-CW connects out to services already running on the same PC (your CAT software, rigctld, or PSTRotator).
| Used for | Protocol | Default port | Adjustable? |
|---|---|---|---|
| CAT proxy → your rig's CAT/TCP server | TCP | 9700 | Yes — Host CAT (TCP) |
| rigctld proxy → a running rigctld | TCP | 4532 | Yes — rigctld host port |
| rigctld auto-launched by DL2CC-REMOTE-CW (its listen port) | TCP | 4532 | Yes — rigctld listen port |
| Antenna rotator → PSTRotator (send commands) | UDP | 12000 | Yes — Rotator port |
| Antenna rotator ← PSTRotator (azimuth updates) | UDP | 12001 | Follows Rotator port + 1 |
Client side (your remote location)
On the client, DL2CC-REMOTE-CW listens so your logging and digimode programs can connect to it as if the radio were local.
| Used for | Protocol | Default port | Adjustable? |
|---|---|---|---|
| CAT port for your logger (e.g. N1MM+) | TCP | 4573 | Yes — Client CAT (TCP) |
| rigctld port for Hamlib applications | TCP | 4532 | Yes — Client rigctld port |
| TRX Emulator (TS-2000) for contest loggers | TCP | 4574 | Yes — TRX emulator port |
| WaveLog QSO upload from MSHV / WSJT-X | UDP | 4575 | Yes — WaveLog QSO port |
| WaveLog Gateway — QSY / tune commands | HTTP | 54321 | Fixed |
| WaveLog Gateway — live radio status | WebSocket | 54322 | Fixed |
| Winkey Proxy for N1MM+ CW | Virtual COM | — | COM port, not a network port |
Window Positions
DL2CC-REMOTE-CW automatically remembers the position and size of every window you open. When you reopen a window, it appears exactly where you left it. The saved positions are specific to your current monitor setup — if you change monitors (e.g. switch from dual to single screen), DL2CC-REMOTE-CW keeps a separate set of positions for each configuration.
File Location
Window positions are stored in the local data folder in a single JSON file:
You can open this folder by pressing Win+R, pasting
%LocalAppData%\DL2CC-REMOTE-CW\WindowStates and pressing Enter,
or by using the DATA button described in Finding the Local Data Folder.
Resetting Window Positions
If a window opens off-screen, at an unexpected size, or you experience any other layout problem, you can reset all saved positions:
- Close DL2CC-REMOTE-CW completely.
- Navigate to the folder shown above.
- Delete the file
windowstates.json. - Restart DL2CC-REMOTE-CW — all windows will open at their default positions.
Bundled Virtual Audio & COM Ports
When you run the Remote Station as a client, you often want third-party software — a digimode decoder, a contest logger, or a WinKey application — to talk to the remote rig as if it were plugged in locally. The DL2CC-REMOTE-CW setup can install the helper drivers needed for that:
- VB-Audio VB-CABLE — routes audio between DL2CC-REMOTE-CW and digimode programs (WSJT-X, MSHV, FLDigi, …).
- com0com virtual COM port pairs — route COM/serial between DL2CC-REMOTE-CW and software that only speaks COM (CAT, TS-2000 emulator, WinKey).
VB-Audio VB-CABLE
If selected during setup, Windows shows two audio devices named CABLE Input and CABLE Output (VB-Audio Virtual Cable). Windows may need a reboot before these devices appear reliably.
- Receive (remote rig → decoder): the digimode program records from CABLE Output.
- Transmit (encoder → remote rig): the digimode program plays its tones to CABLE Input.
The names look reversed because they describe the cable endpoints: one program plays audio into CABLE Input, and another program records the same audio from CABLE Output. Select the matching devices in DL2CC-REMOTE-CW's audio settings depending on whether you want receive audio, transmit audio, or both.
com0com Virtual COM Port Pairs
If selected during setup, DL2CC-REMOTE-CW creates three com0com port pairs. Each pair has a DL2CC-REMOTE-CW side and an external-software side. In the normal preferred mapping, the odd-numbered port is used in DL2CC-REMOTE-CW and the following even-numbered port is used in your external program.
| Use | DL2CC-REMOTE-CW side | External software side |
|---|---|---|
| CAT bridge | COM21 | COM22 (WSJT-X / logger) |
| TRX Emulator / TSEMU | COM23 | COM24 (external software) |
| Winkey Proxy / Emulator | COM25 | COM26 (N1MM+ / logger Winkey) |
If one of the preferred port numbers was already occupied, Windows assigns a free fallback port. The actual mapping is saved by setup and is the authority for your PC:
%LocalAppData%\DL2CC-REMOTE-CW\Setup\virtual-com-ports.txt%LocalAppData%\DL2CC-REMOTE-CW\Setup\setup-notes.txt
%LocalAppData%\DL2CC-REMOTE-CW\Setup\com0com. Normal users do not need to run
them after setup. They are provided for inspection, support, and advanced manual changes;
applying changes there may remove and recreate virtual COM devices.
3rd Party Software Config
This section collects concrete setup examples for programs that work alongside DL2CC-REMOTE-CW. The examples assume the remote station is running as a client and DL2CC-REMOTE-CW provides the local interfaces that the external program connects to: audio through VB-CABLE, CAT through a virtual COM port or TCP listener, and completed QSOs through the WaveLog UDP listener.
127.0.0.1, so MSHV talks only to programs
running on the same Windows PC. The actual remote radio link still runs through
DL2CC-REMOTE-CW's Remote Station connection.
MSHV
MSHV can be used with DL2CC-REMOTE-CW for digimode operation. In a typical setup, DL2CC-REMOTE-CW supplies the remote receiver audio to MSHV through a virtual audio cable, exposes CAT/PTT through the client-side TRX/CAT interface, and receives logged QSOs from MSHV for forwarding to WaveLog.
- Route the audio through a virtual audio cable. In MSHV, set the receive Input Devices to the cable's recording side (CABLE Output in the screenshot) and the transmit Output Devices to the cable's playback side (CABLE Input in the screenshot).
-
In DL2CC-REMOTE-CW, enable the client-side WaveLog QSO UDP listener.
The default listen address is
127.0.0.1and the default UDP port is4575. -
In MSHV, open the network / ADIF broadcast settings, enable
Enable Logged QSO ADIF, set Server to
127.0.0.1, and set Port to4575. -
Configure MSHV rig control to use the local CAT path provided by DL2CC-REMOTE-CW.
With the bundled com0com preferred mapping, select the external-software side of the
TRX Emulator / TSEMU pair in MSHV: normally
COM24. DL2CC-REMOTE-CW uses the matching DL2CC side, normallyCOM23. If setup assigned fallback ports, use the values fromvirtual-com-ports.txt. If you use a TCP listener instead, use the matching localhost address and port from your DL2CC-REMOTE-CW client settings.
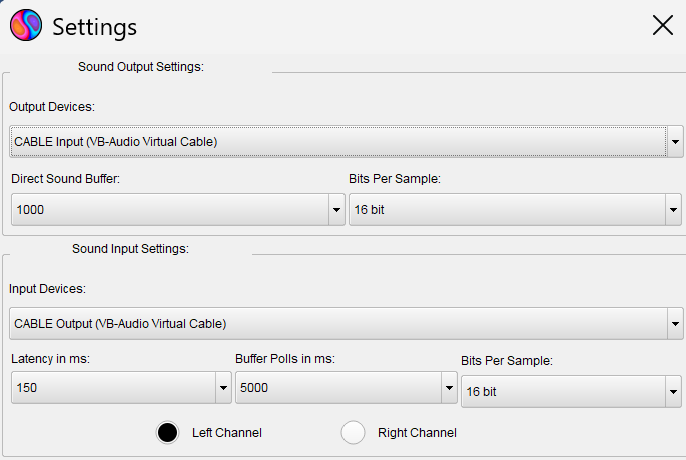
MSHV Sound Settings — the decoder listens to CABLE Output, while MSHV sends its transmit tones to CABLE Input
The device names look reversed at first, but they are Windows audio endpoint names: programs play audio into CABLE Input, and other programs record that same audio from CABLE Output. Match the corresponding audio devices in DL2CC-REMOTE-CW so received audio reaches MSHV and MSHV's transmit tones go back to the remote station audio input. For pure receive/decoding tests, the MSHV input side is enough; transmitting also needs the output side plus working PTT/CAT.

MSHV UDP Broadcast Settings — Enable Logged QSO ADIF sends completed QSOs as ADIF to DL2CC-REMOTE-CW on
127.0.0.1:4575
The green status line confirms that MSHV can reach the local UDP destination. In this example, Enable Logged QSO and Enable Decoded Text are not needed for WaveLog upload through DL2CC-REMOTE-CW; the important option is Enable Logged QSO ADIF.
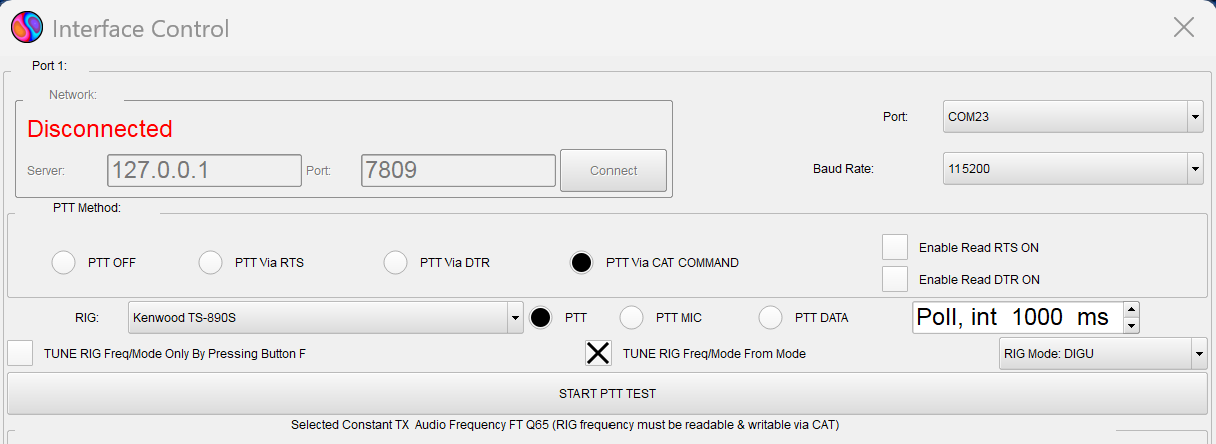
MSHV Interface Control — CAT/PTT runs through the selected local interface; use the external-software side from the setup notes, normally COM24 for the TRX Emulator pair
The Port field on the right is the CAT interface MSHV opens. With the bundled com0com pair, MSHV opens the external side and DL2CC-REMOTE-CW opens the DL2CC side. PTT Via CAT COMMAND tells MSHV to key the transmitter over CAT instead of using RTS/DTR line toggling. The network box on the left is not required in this COM-port example, so it may remain disconnected. The screenshot shows where to set the port; use the actual port numbers from your setup notes if they differ.
Updating DL2CC-REMOTE-CW
DL2CC-REMOTE-CW checks for a newer version each time it starts. When one is available, a blue notification bar appears at the bottom of the main dashboard reading "New version X.Y.Z available (you have A.B.C)", with a Download link and a Details… link that opens the release notes. The bar is only a reminder — nothing is downloaded or changed until you decide to update. You can hide it with the × on the right; it returns at the next start while the update is still pending.
- Close all DL2CC-REMOTE-CW windows. Quit the app on this PC so no files are in use while the installer runs.
- Download the new setup from https://dl2cc.de/download — either by clicking Download on the update bar, or by opening the page in your browser.
- Do not uninstall the old version. Just run the downloaded setup. It installs over the existing version in place and carries all your settings forward.
- Start DL2CC-REMOTE-CW. The dashboard now shows the new version number and the update bar is gone.
The DL2CC Box has its own firmware, updated separately from the app. DL2CC-REMOTE-CW shows a matching orange "Device firmware update available" bar on the dashboard when your Box needs newer firmware — see Firmware Updates below.
Firmware Updates
The DL2CC Remote CW Box firmware can be updated directly from your browser using the web flasher at dl2cc.de/webflash. Connect the Box via USB, open the link, select your device and flash.
You don't have to check for firmware updates yourself. Whenever your Box is connected, DL2CC-REMOTE-CW compares its firmware against the current version at startup. If newer firmware is available, an orange "Device firmware update available" bar appears at the bottom of the main dashboard, with an Update firmware link that opens the web flasher for you. Only flash when this bar tells you to — there is no need to update otherwise.
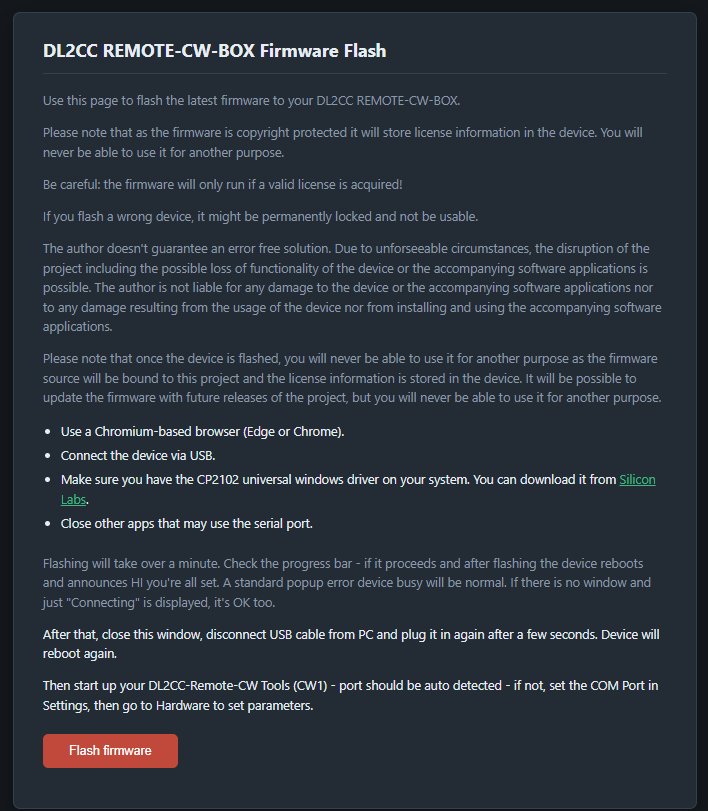
Firmware web flasher at dl2cc.de/webflash — update the Box firmware directly from your browser