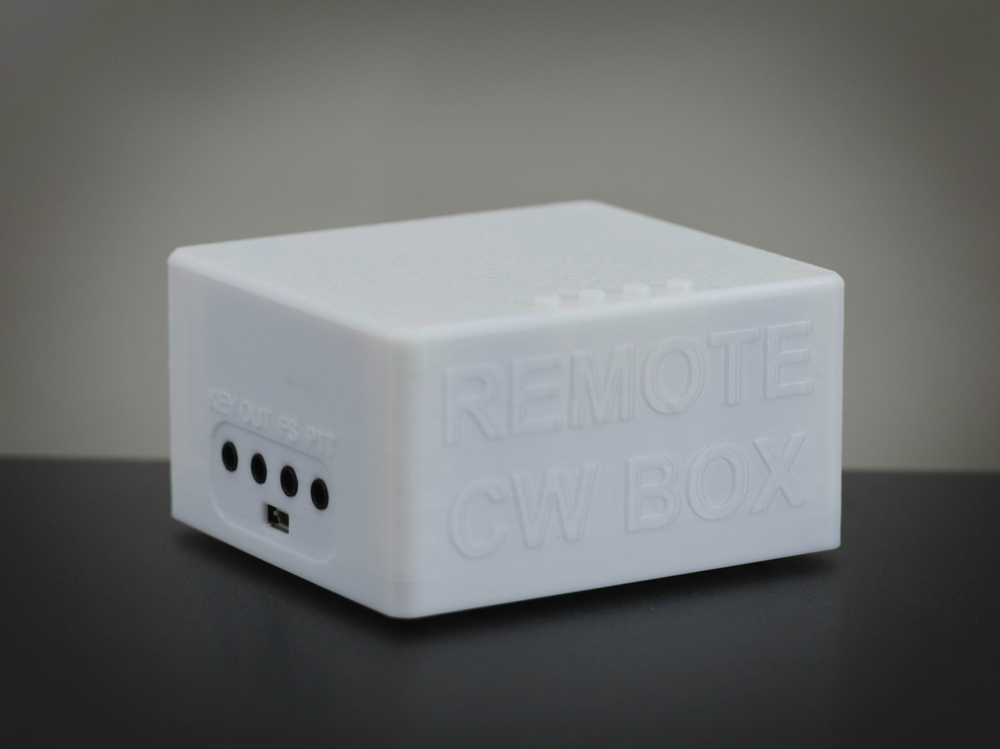
DL2CC Remote CW Box
The DL2CC Remote CW Box is the hardware companion for DL2CC-REMOTE-CW. It is a compact ESP32-based device with CW keyer, hardware sidetone, PTT control, paddle and straight key inputs, headphone output, and WiFi.
What the Box Provides
CW Keyer Engine
Standalone keyer with ultra-fast CMOS electronic relays. Iambic A/B, Ultimatic, and Straight Key modes. 5–100 WPM. Dedicated speed ± buttons. No PC required. Fully WINKEY-compatible — works with any logging software.
Hardware Sidetone
48 kHz sidetone, adjustable from 550 to 750 Hz. Generated in the Box hardware, not on the PC.
Headphone & Stereo Speakers
Two 3 W speakers (stereo) plus headphone jack with automatic detection. Doubles as a station stereo speaker for your rig audio — both in local and remote operation.
Line In Mix
Mix remote station audio from your PC by 3.5 mm stereo cable or Bluetooth directly with hardware sidetone in your headphones.
CW Key & PTT Output
Both outputs are protected by CMOS electronic relays for direct transceiver interfacing. PTT lead-in, tail delay, and 1st-element extension are configurable.
WiFi Connectivity
WPA2/WPA3 WiFi with DHCP or static IP. TCP server on port 7373. The Box can also be used without a cable. For the cleanest audio, USB serial is recommended — see the note in the WiFi setup section below.
Physical Layout
All signal connectors are on the front and rear panels. Four tactile buttons on the top surface control speed and user-assignable functions.
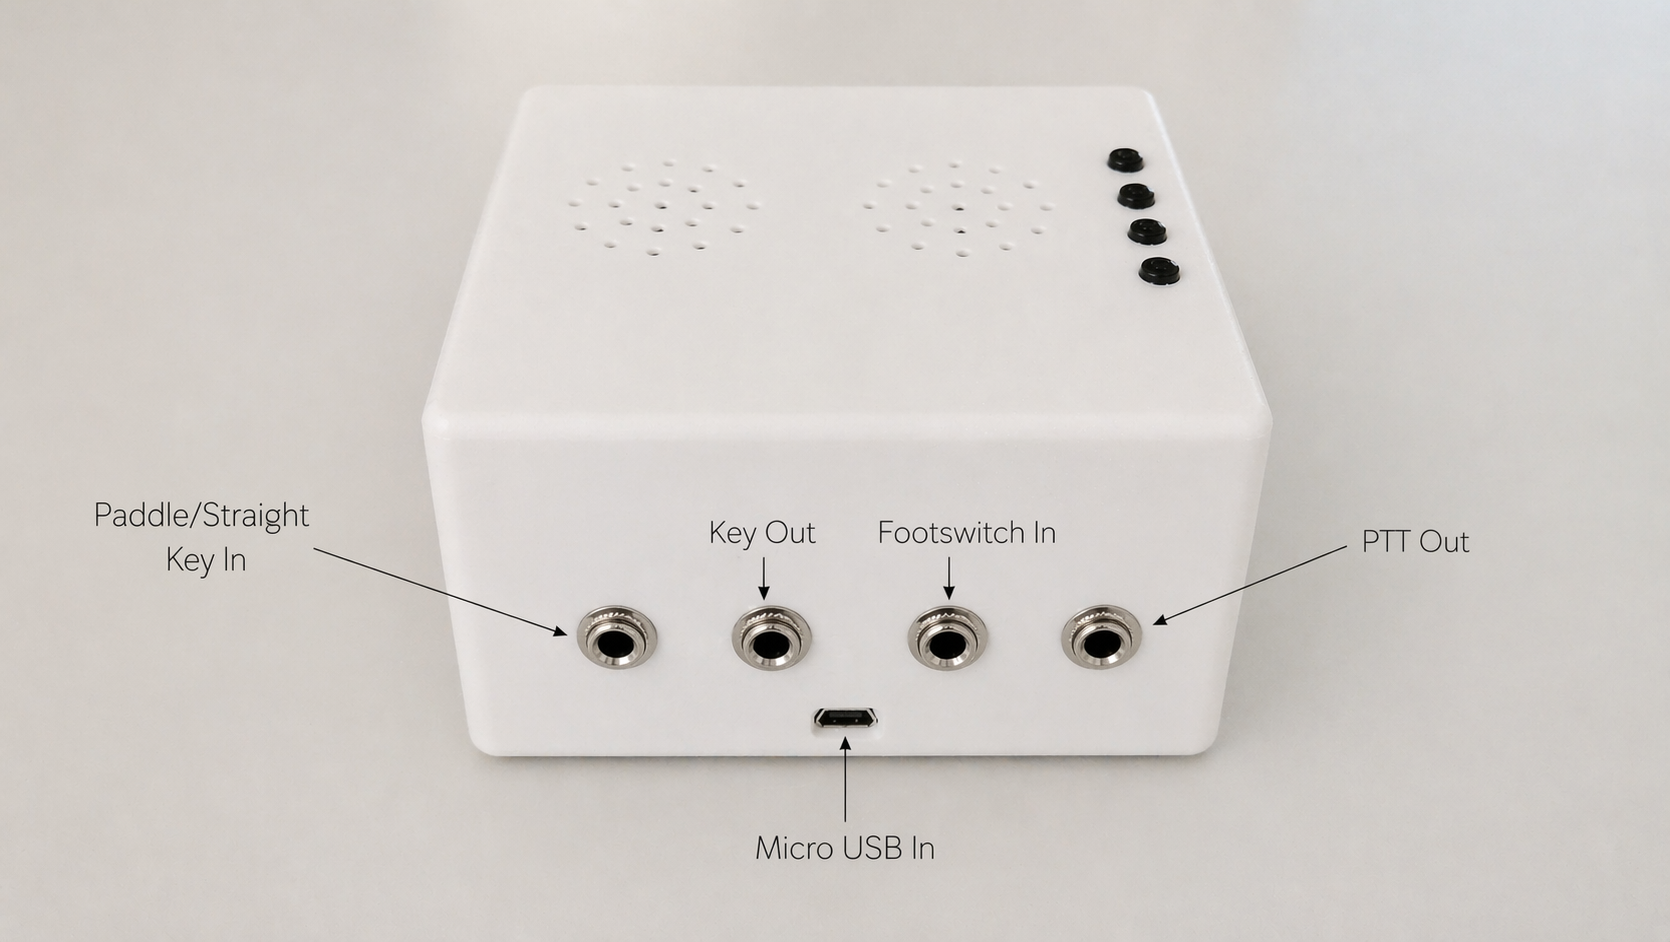
Left side — key, PTT, and USB connectors

Right side — audio input and headphone output
Top Buttons
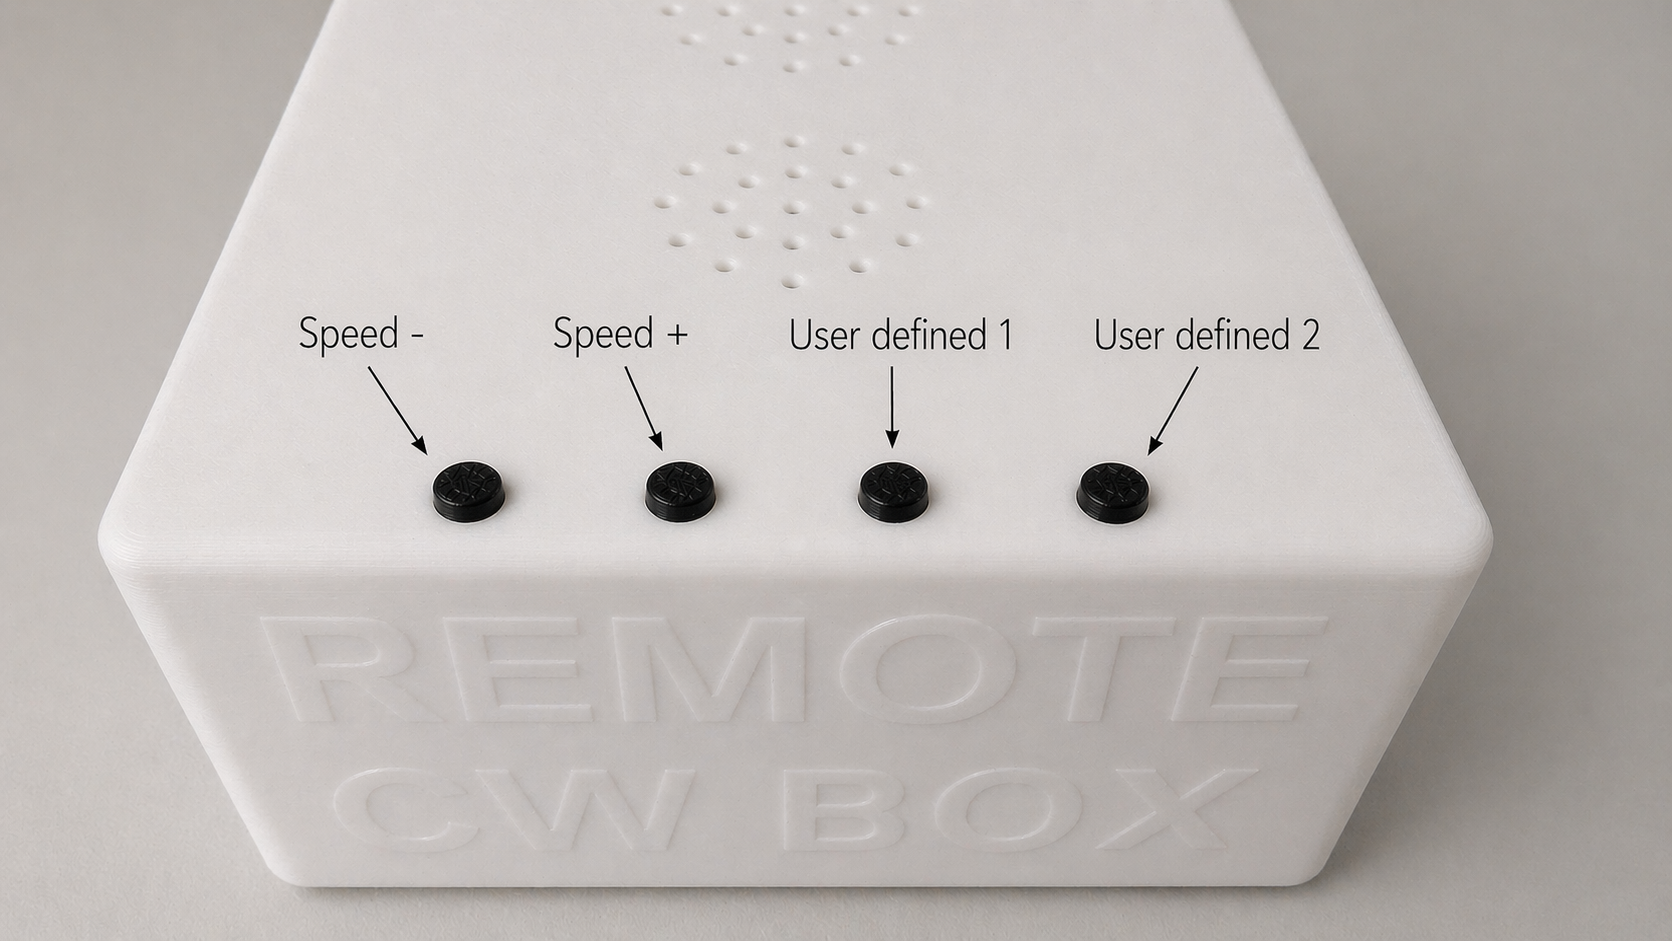
Top panel (left to right): Speed −, Speed +, User defined 1, User defined 2
Speed − / Speed + Buttons
A quick tap announces the current keyer speed in CW. Each additional tap while the announcement is playing steps the speed down or up by 1 WPM. You always know your speed — no PC or software required.
User Defined Buttons (3rd and 4th)
The two right-hand buttons are fully user-configurable — you choose what each one does. Factory defaults are SPKVOL (3rd) and SIDETONEVOL (4th). Each press is acknowledged with a short sidetone pip.
→ See Hardware Settings → Macros tab for the full list of assignable functions and how to change them.
Connectors & Inputs
| Connector | Purpose |
|---|---|
| Paddle / Straight Key In (3.5 mm) | Iambic paddle (dual- or single-lever) or straight key / bug — shared jack |
| Key Out (3.5 mm) | CMOS electronic relay–protected CW key output to rig key jack |
| Footswitch In (3.5 mm) | PTT footswitch (debounced in firmware) |
| PTT Out (3.5 mm) | CMOS electronic relay–protected PTT output to rig PTT input |
| Micro USB | Serial COM port (115200 baud DL2CC / 1200 baud WINKEY) + 5 V power |
| Audio In (3.5 mm stereo) | Line input from PC or other source — mixed with sidetone |
| Headphones (3.5 mm) | Headphone output with auto-detect |
Connecting to DL2CC-REMOTE-CW — First Time
USB / Serial (Recommended for Getting Started)
- Connect the Box to your PC with a USB cable. The Silicon Labs CP210x driver is included in the DL2CC-REMOTE-CW installer; if you need it standalone, download it from Silicon Labs. Windows assigns a COM port automatically.
- Note the assigned COM port in Device Manager
(e.g.
COM5). - In DL2CC-REMOTE-CW, open File → Hardware Settings.
- On the Connection tab, select the COM port from the dropdown.
- Click Connect. DL2CC-REMOTE-CW performs a boot handshake and HMAC authentication.
- The status indicator turns green and shows the Box MAC address — you are connected.
WiFi / TCP (optional network connection)
WiFi is supported, but it is no longer needed just to keep Winkey available for a logger.
With the bundled com0com ports, leave the Box connected by USB, enable the
Winkey Proxy on COM25, and set
your logger to COM26. Use WiFi mainly when a USB cable to the PC is impractical.
- First, connect via USB and go to Hardware Settings → WiFi.
- Use the Scan button to discover nearby networks, select yours, and enter the password.
- Click APPLY & CONNECT. The Box
will connect to WiFi and show its IP address. Wait for the
IP address to appear in the status line at the top, copy
the IP Address.
- In the Connection tab, enter the IP Address and click "Connect hardware through TCP" and click "Save&Apply" to use WiFi.
Fixing a Duplicate or Conflicting COM Port
Windows assigns a COM number to the Box automatically the first time it is plugged in, and remembers it across reboots. Over time — after using other USB-serial devices (other CP210x adapters, FTDI / CH340 cables, Arduino boards, etc.) — Windows can run out of low COM numbers or hand the Box a number that is already reserved by a device that is no longer connected. The result: DL2CC-REMOTE-CW cannot open the port, the dropdown shows the wrong number, or you see a "port in use" error even though nothing else is running.
The fix is to manually pick a free COM number for the Box in Windows Device Manager:
- Make sure the Box is connected via USB and DL2CC-REMOTE-CW is not connected to it (close the Hardware Settings dialog or click Disconnect).
- Press Win+X and choose Device Manager.
- Expand Ports (COM & LPT). The Box appears as Silicon Labs CP210x USB to UART Bridge (COMn).
- Right-click the entry → Properties → Port Settings tab → Advanced…
- Open the COM Port Number dropdown and
pick a free number (any number between
COM3andCOM16works well — most logging and CAT software accepts only low COM numbers). Numbers labelled (in use) that belong to devices you no longer use can be reassigned safely; Windows will show a warning, click Yes. - Click OK on both dialogs and close Device Manager.
- Unplug the USB cable, wait two seconds, plug it back in. The Box will now enumerate on the new COM number.
- Open File → Hardware Settings in DL2CC-REMOTE-CW, select the new COM port from the dropdown, and click Connect. You should hear the Morse R confirmation.
COM16 or
COM20. If the Box ends up on
COM23 or higher, reassigning it to a low free
number using the steps above is the cleanest fix.
Browser-Based Configuration (No Windows App)
The Box can be configured entirely from a web browser — no Windows installation required. Open dl2cc.de/webconfig, connect the Box, and you get the same settings as the Hardware Settings window described below (Connection, WiFi, Audio, Keyer, PTT, Macros, and a raw command Log). This makes the Box a fully standalone device for everyday use.
- Works on Windows, macOS, and Linux — it runs in the browser, so no program is installed. Use a Chromium-based desktop browser and open the page over HTTPS (the link above is).
- Connect the Box by USB and close any other application using its COM port — Windows COM ports can only be used by one program at a time.
- After connecting, the tool reads the current settings from the Box. Nothing is shown until the Box has answered, so the values always reflect the device.
- If newer firmware is available for your Box, the tool shows a notice and an Update firmware… button that opens the web flasher (see Firmware Updates).
Firefox and Safari do not work with this tool. They do not support the Web Serial standard the page needs to talk to the Box over USB. Use Google Chrome or Microsoft Edge — or another Chromium-based desktop browser such as Brave, Opera, or Arc — on a Windows, Mac, or Linux computer.
iPhones and iPads are not supported either — no browser on iOS / iPadOS currently provides the Web Serial access this tool needs.
Android phones and tablets are not supported yet: USB configuration needs a desktop browser. Bluetooth support for Android is planned for a future Box firmware update.
Hardware Settings — Tab Reference
Open File → Hardware Settings — or use the browser tool above — to configure all Box parameters. The tabs follow this order: Connection → WiFi → Audio → Keyer → PTT+CW → Macros → Log.
Connection Tab
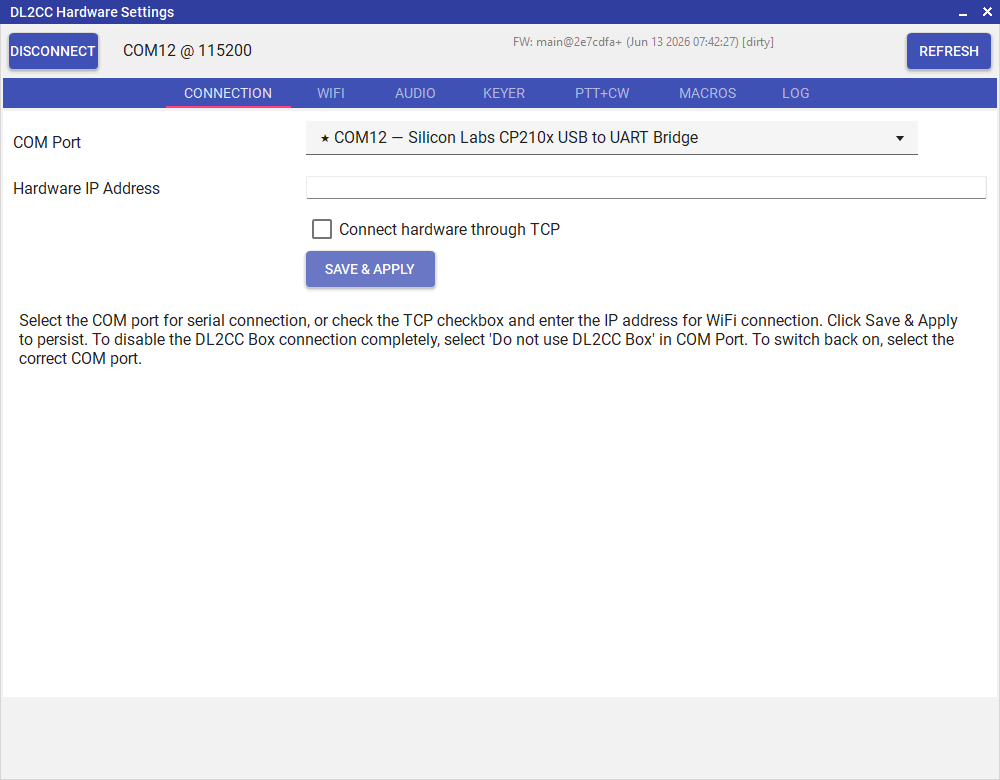
Connection tab — COM port or TCP/WiFi selection and connect status
| Control | Purpose |
|---|---|
| COM Port | Select the serial COM port Windows has assigned to the Box. Leave it on ------- to let DL2CC-REMOTE-CW find the Box automatically, or pick a specific port if auto-detection chose the wrong one. |
| Do not use DL2CC Box | The first entry in the COM Port list. Choose it if you do not own a Box and want to use the software on its own. The app then stops looking for hardware on startup, hides the "Hardware not connected" message, and greys out the features that need the Box. Pick a real COM port and click SAVE & APPLY at any time to start using a Box. |
| Connect hardware through TCP | Check this to connect over WiFi instead of USB. When checked, the Hardware IP Address field is used instead of the COM port. |
| Hardware IP Address | The Box's WiFi IP address. Set this after connecting via the WiFi tab and noting the assigned address. |
| SAVE & APPLY | Saves the connection settings and reconnects to the Box using the new configuration. |
WiFi Tab
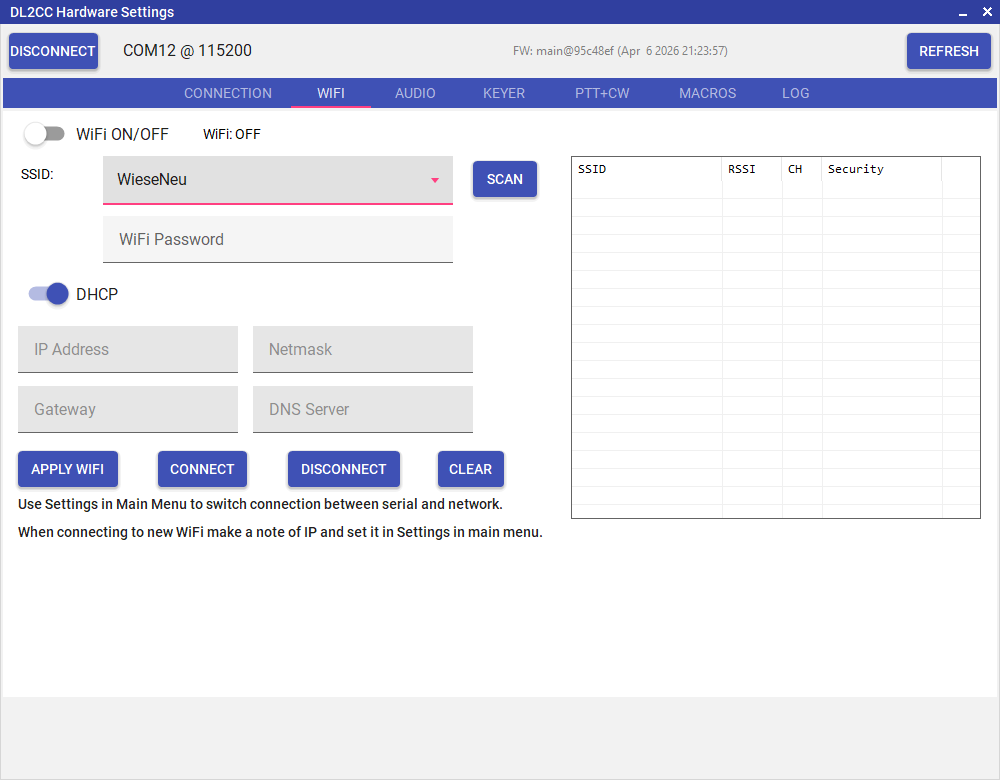
WiFi tab — SSID, password, DHCP, and network scan
| Control | Purpose |
|---|---|
| WiFi ON/OFF | Enables or disables the Box's WiFi radio. Turning WiFi on disables Bluetooth. |
| SSID | The name of the wireless network to connect to. Click SCAN to populate the list from nearby networks. |
| WiFi Password | Password for the selected network. |
| DHCP | When on, the Box requests an IP address automatically. When off, you can enter a static IP Address, Netmask, Gateway, and DNS Server manually. |
| IP Address / Netmask / Gateway / DNS Server | Static network configuration — only active when DHCP is off. |
| SCAN | Scans for nearby networks and populates the SSID list with results (SSID, signal strength RSSI, channel, and security type). |
| APPLY WIFI | Saves the SSID, password, and IP settings to the Box. |
| CONNECT / DISCONNECT | Manually connect to or disconnect from the configured WiFi network. |
| CLEAR | Clears the stored SSID and password from the Box. |
Audio Tab
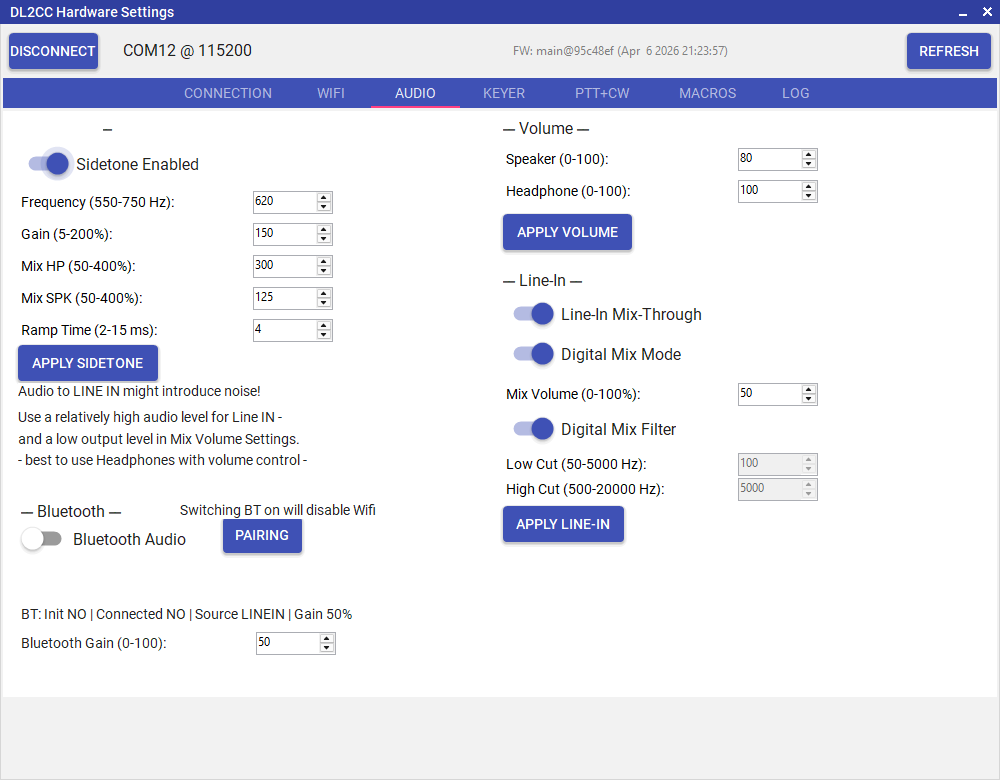
Audio tab — sidetone, input/output levels and analog vs digital mix mode
The reliable fix is a passive 3.5 mm audio ground loop isolator inserted inline between the PC's headphone or line-out jack and the Box's Line In jack. It uses a small transformer to break the DC ground path while passing the audio. No power, no driver, no settings — plug it in and the hum is gone.
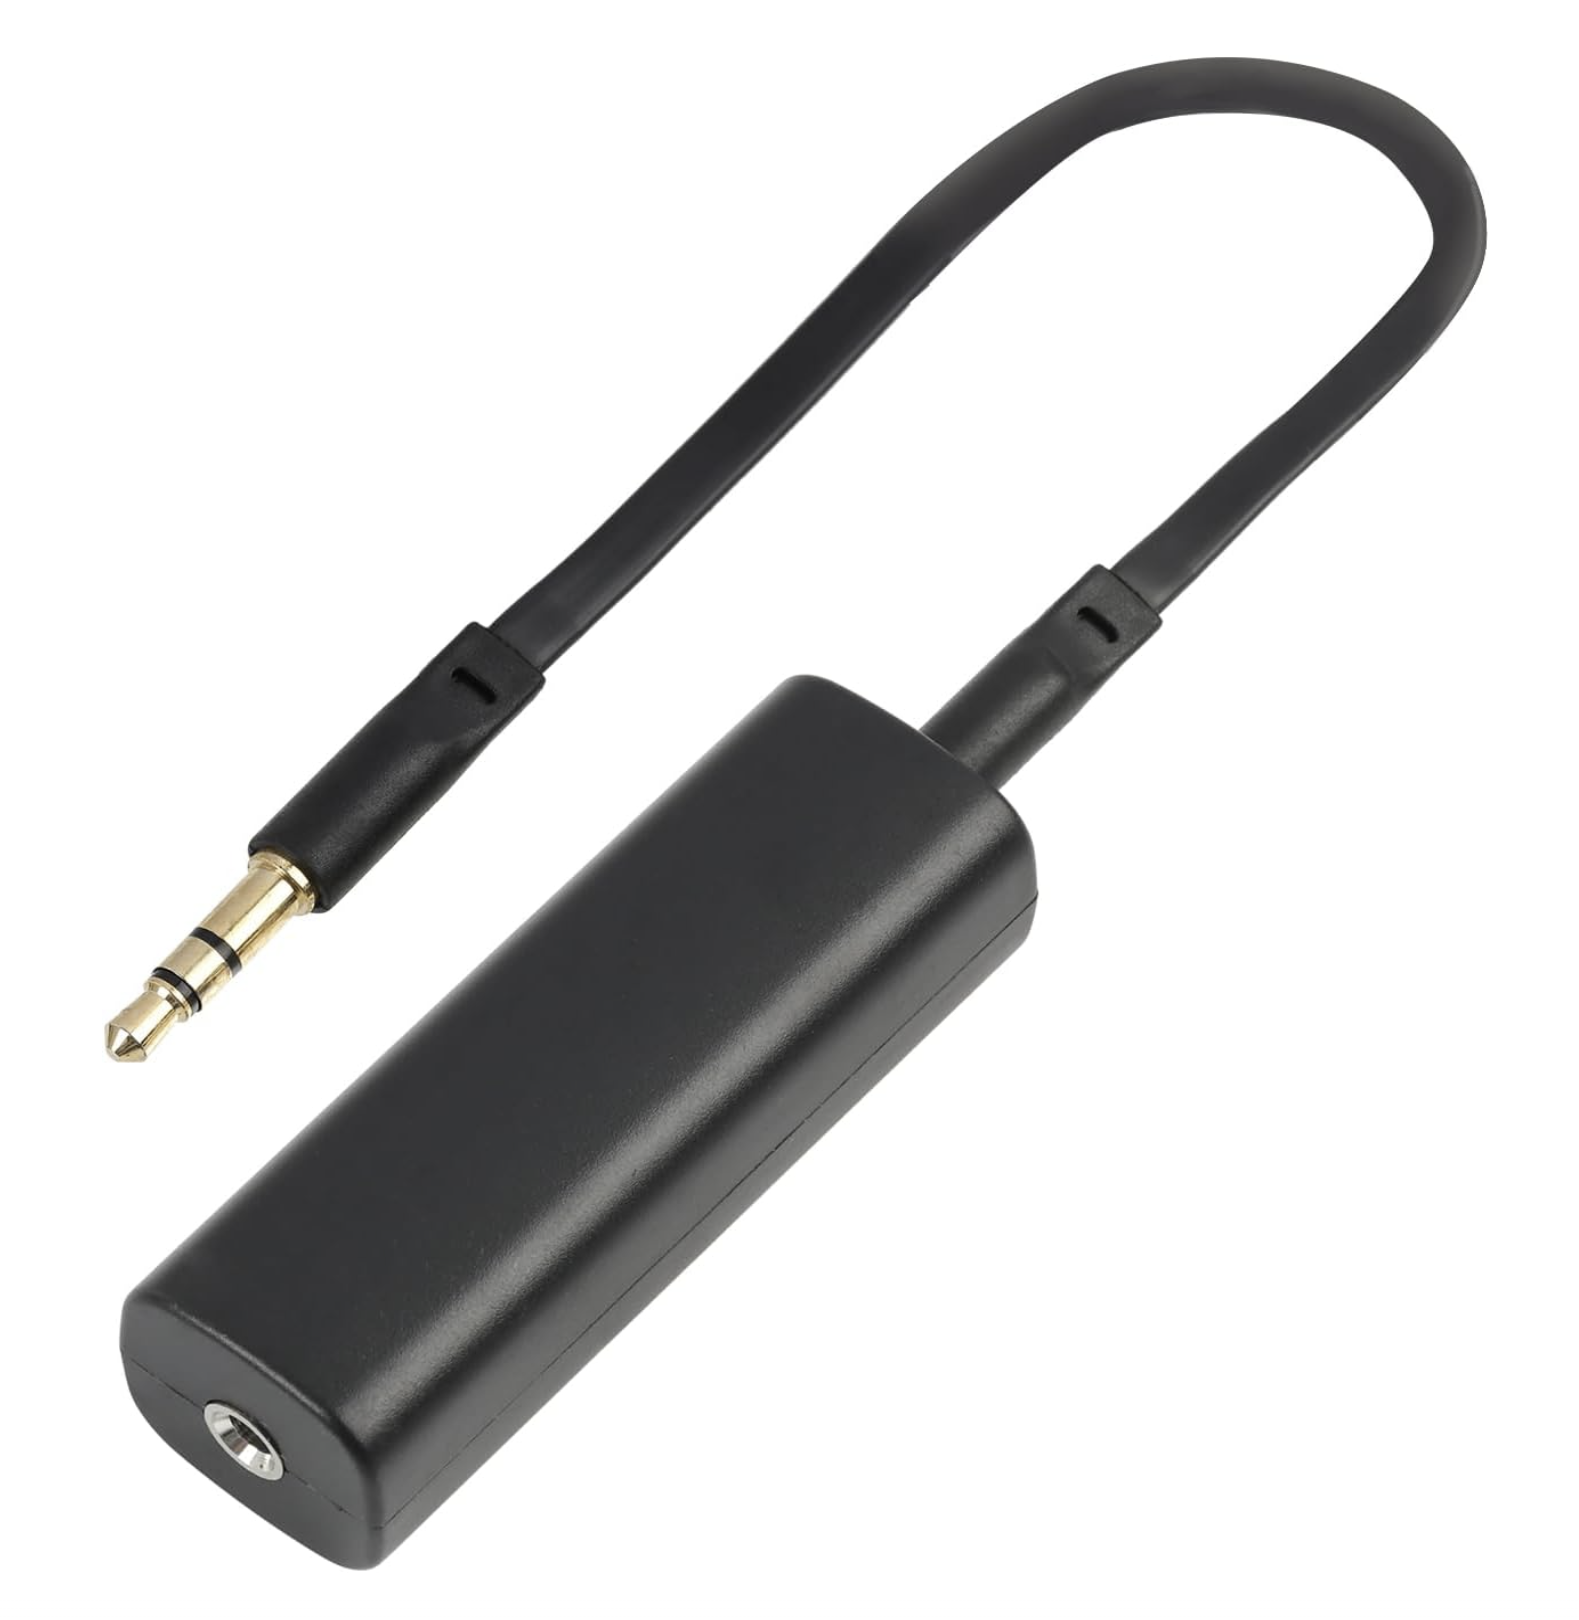
3.5 mm audio ground loop isolator — inline between PC audio out and the Box's Line In
Sample product (Amazon Germany): amazon.de/dp/B0G33TF2WN. Outside Germany, search your local Amazon (or any electronics retailer) for "3.5 mm audio ground loop isolator" — these adapters are commodity parts, typically €5–€15.
| Setting / Button | Description | Default |
|---|---|---|
| — Sidetone — | ||
| Sidetone Enabled | Turn hardware sidetone on or off | On |
| Frequency (550–750 Hz) | Sidetone pitch | 620 Hz |
| Gain (5–200%) | Sidetone oscillator level | 30% |
| Mix HP (50–400%) | Sidetone blend level in the headphone output | 400% |
| Mix SPK (50–400%) | Sidetone blend level in the speaker output | 125% |
| Ramp Time (2–15 ms) | Sidetone attack and release time. Shorter = crisper click; longer = softer onset | 4 ms |
| APPLY SIDETONE | Sends all sidetone settings to the Box | — |
| — Volume — | ||
| Speaker (0–100) | Overall speaker output level | 80 |
| Headphone (0–100) | Headphone output level | 100 |
| APPLY VOLUME | Sends speaker and headphone volume to the Box | — |
| — Line-In — | ||
| Line-In Mix-Through | Include the Line In signal in the headphone / speaker mix | On |
| Digital Mix Mode | When on, Line In is captured via ADC and mixed in software (allows filter and volume control). When off, Line In is routed through the codec's hardware bypass for lowest latency | On |
| Mix Volume (0–100%) | Level of the Line In signal in the mix | 50% |
| Digital Mix Filter | Bandpass filter for the digital Line In mix — enable to cut hum (Low Cut HPF) and hiss (High Cut LPF) | On |
| Low Cut (50–5000 Hz) | High-pass filter corner frequency — removes low-frequency hum | 100 Hz |
| High Cut (500–20000 Hz) | Low-pass filter corner frequency — removes high-frequency hiss | 5000 Hz |
| APPLY LINE-IN | Sends all Line-In settings to the Box | — |
| — Bluetooth — | ||
| Bluetooth Audio | Enables the Box's Bluetooth audio receiver. Turning Bluetooth on disables WiFi — the two radios cannot run at the same time on the ESP32. | Off |
| PAIRING | Puts the Box into Bluetooth pairing mode so a phone or tablet can connect as the audio source | — |
| Bluetooth Gain (0–100) | Input gain for the Bluetooth audio stream | 50 |
Keyer Tab
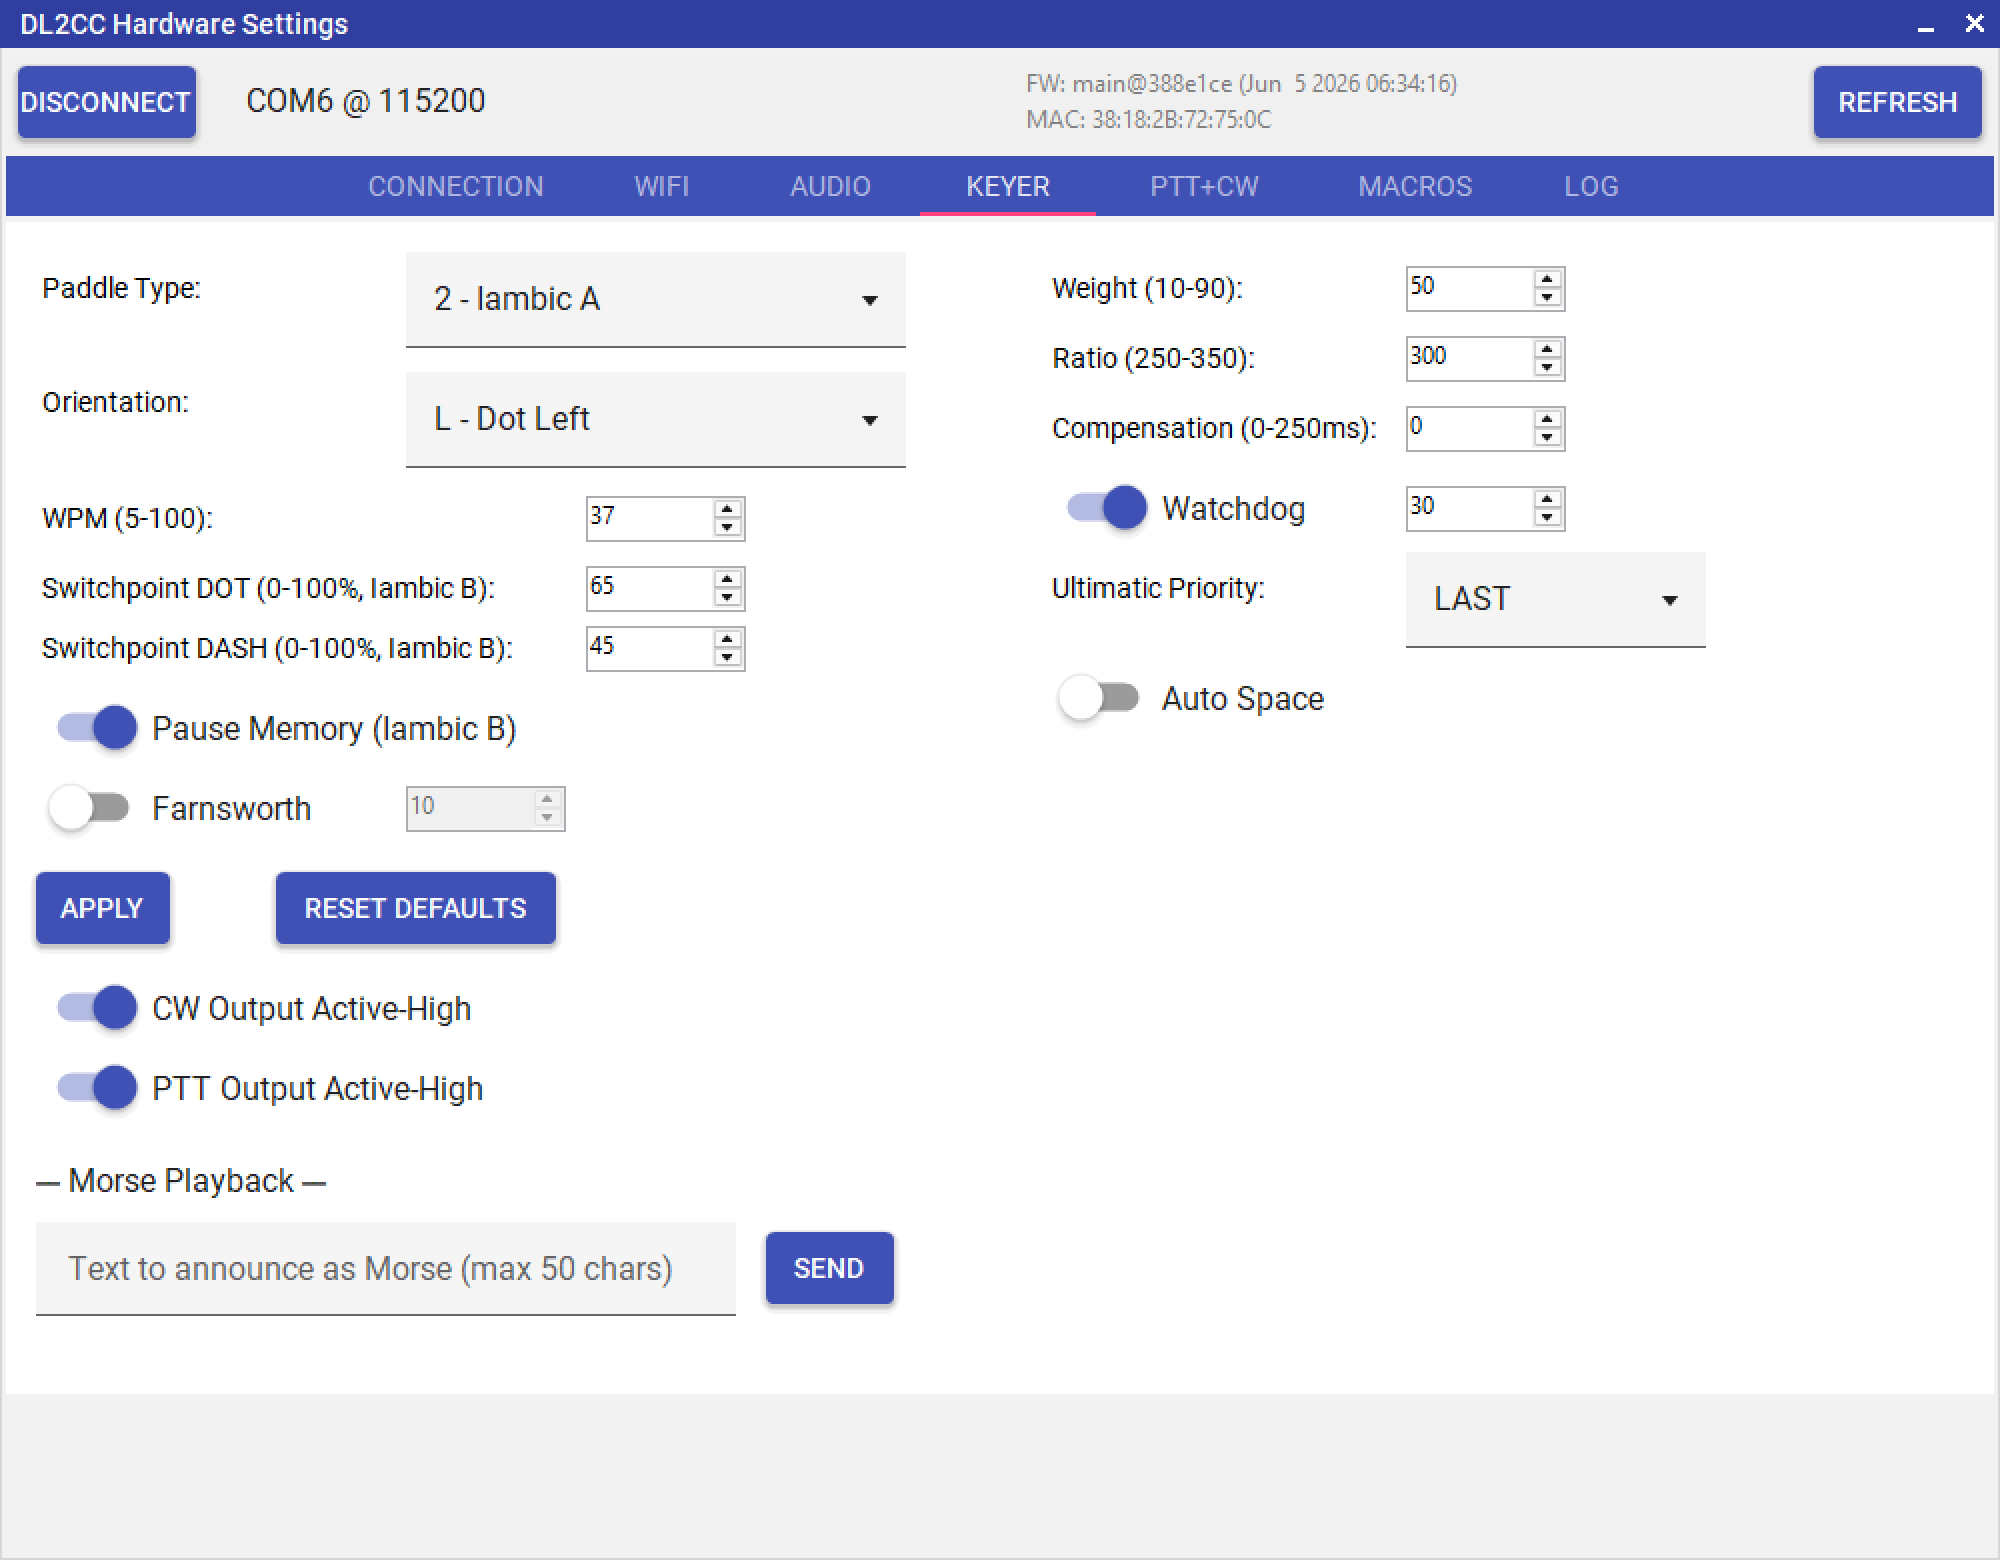
Keyer tab — iambic mode, WPM, Farnsworth, paddle orientation and weight
| Setting | Description | Default |
|---|---|---|
| Paddle Type | Iambic A, Iambic B, Ultimatic, or Straight Key | Iambic B |
| WPM (5–100) | Keyer speed | 30 WPM |
| Farnsworth | Extended character spacing for practice — characters sent at the Farnsworth WPM, word and letter gaps at the normal (slower) WPM | Off |
| Paddle Orientation | Swap dot and dash paddles (L = dot-left / dash-right, R = dot-right / dash-left) | L (dot-left) |
| Weight | Element weighting 10–90: 50 = standard, above 50 lengthens key-down (heavier feel), below 50 shortens it (lighter feel) | 50 |
| Iambic B Switchpoint | Memory recognition window for Iambic B — how far into an element a squeeze must start to trigger B-memory. 0% = classic B (whole element), 100% = effectively Iambic A (only when Pause Memory is off) | Dot: 65%, Dash: 45% |
| Pause Memory | Iambic B only. Extends the dit/dah memory into the inter-element pause so a deliberate opposite tap is remembered for the whole gap, not just during the element | On |
| Dot/Dash Ratio | Dash-to-dot length multiplier × 100 (range 250–350). 300 = standard 3:1 Morse ratio | 300 (3:1) |
| Key Compensation | Fixed time added to every key-down and subtracted from the gap (0–250 ms). Compensates for relay or contact timing offset | 0 ms |
| Paddle Watchdog | Silences the keyer if a paddle remains continuously pressed beyond the timeout (5–120 s). Protects against stuck paddles or shorted cables during TX | On, 30 s |
| Ultimatic Priority | Tiebreak when both paddles are held in Ultimatic mode: Last = last paddle pressed wins, Dot = dots always win, Dash = dashes always win | Last |
| Autospace | When enabled, if the paddle is idle for longer than one dit after an element ends, the keyer automatically extends the gap to a full letter-space (3 dits). Helps produce clean character spacing without precise timing | Off |
| APPLY | Sends all keyer settings to the Box | — |
| RESET DEFAULTS | Restores all keyer parameters to factory values in one step | — |
| CW Output Active-High | Sets the polarity of the CW key output. Active-High means the output goes high (positive voltage) when keying. Disable for rigs that expect Active-Low (pulled to ground). Match this to your transceiver's key jack requirements. | On |
| PTT Output Active-High | Sets the polarity of the PTT output. Same principle as CW Output Active-High — match to your rig. | On |

Iambic A vs. Iambic B — Iambic B adds one extra opposite element when both paddles are released

Switchpoint and Pause Memory — when the keyer watches the opposite paddle to queue it as the next element

Straight Key — the iambic keyer is bypassed; you key a straight key, bug, or external keyer directly

Ultimatic — with both paddles held, the last paddle pressed wins and its element repeats
PTT+CW Tab
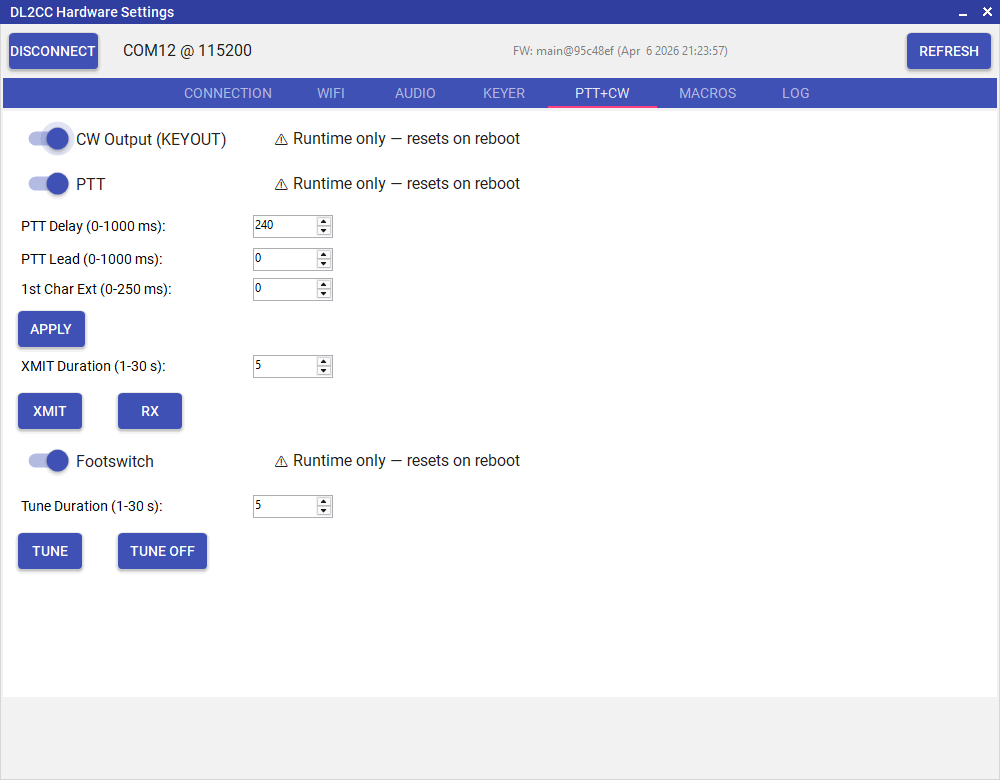
PTT+CW tab — lead-in, tail, 1st-element extension and footswitch debounce
| Setting / Button | Description | Default |
|---|---|---|
| PTT Lead (0–1000 ms) | Delay between PTT assert and the first CW element. Use this to compensate for TX relay switching time so the first dot or dash is not clipped | 0 ms |
| PTT Delay (0–1000 ms) | How long PTT stays asserted after the last CW element ends. Prevents rapid PTT bounce between letters at the end of a transmission | 240 ms |
| 1st Char Ext (0–250 ms) | Lengthens the very first dit or dah after each PTT activation by this amount. Compensates for TX relay or sequencer latency that clips the leading edge | 0 ms |
| APPLY | Saves PTT timing settings to the Box without triggering a test transmission | — |
| Footswitch | Enable or disable the footswitch PTT input on the 3.5 mm Footswitch In jack. The hardware debounce filter is fixed at 16 ms in firmware | Enabled |
Test Buttons
| Button / Setting | Description |
|---|---|
| XMIT Duration (1–30 s) | How long PTT is held when you click XMIT |
| XMIT | Applies the current PTT timing settings, then asserts PTT for the configured duration. Handy for checking that your TX relay fires and the lead-in/tail timing is right — no CW is sent |
| RX | Releases PTT immediately and returns the rig to receive, regardless of the XMIT timer |
| Tune Duration (1–30 s) | How long the TUNE carrier lasts |
| Tune | Keys up the transceiver with a continuous carrier (PTT + CW key out) for the configured duration. Use it to tune your antenna |
| Tune Off | Stops the TUNE carrier immediately, regardless of the timer |
Macros Tab
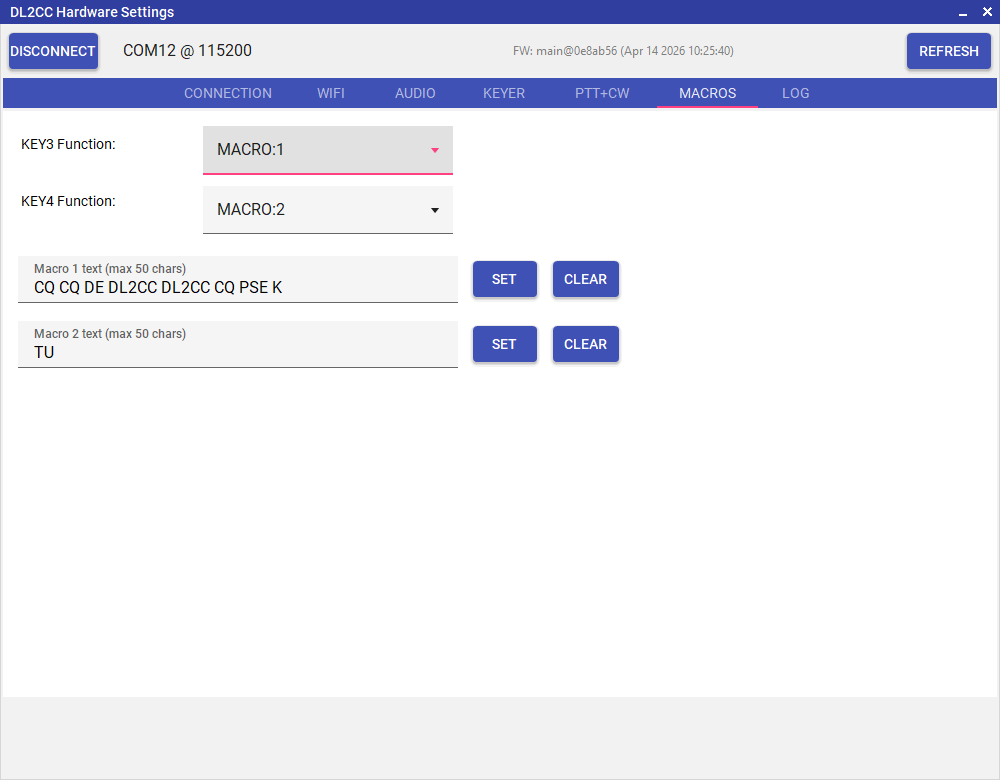
Macros tab — CW macro text and user button assignments
Assign functions to the two user-defined buttons (KEY3 and KEY4) and manage the two CW macro texts (up to 50 characters each). Type the macro text in the field and click SET to store it on the Box; CLEAR removes the stored text.
Each button can be set to one of the following functions:
KEYERMODE— Cycle through paddle type and orientation (Straight → Iambic A/B → Ultimatic, left/right dot). The new mode is announced in CW.TUNE— While the button is held, the Box asserts a continuous CW key output (PTT, sidetone and key-out active). Releasing ends Tune immediately; an automatic timeout stops it after 30 seconds.MACRO:1/MACRO:2— Play a stored CW macro text (up to 50 characters each, set in this tab).SPKONOFF— Mute or unmute the speaker. This is a pure runtime function: the persisted volume is not changed, and the mute clears on reboot or on any explicit volume change.SPKVOL— Cycle the speaker mix volume (sidetone level in the speaker output) through 9 positions: OFF / 50 / 100 / 150 / 200 / 250 / 300 / 350 / 400 %. From 400 % the next press goes to OFF, and from OFF the next press goes to 50 %. The 50–400 % steps are persisted to NVS (same setting asSIDETONE:MIXSPK). The OFF position reuses the runtime mute gate fromSPKONOFF— NVS is not overwritten, so after reboot the Box returns to the last audible mix instead of coming up muted.SIDETONEVOL— Cycle the master sidetone gain through 6 positions: OFF / 20 / 40 / 60 / 80 / 100 %. From 100 % the next press goes to OFF, and from OFF the next press goes to 20 %. The 20–100 % steps use the same stored setting asSIDETONE:GAIN. The OFF position switches the sidetone off completely — the same state as the sidetone Enable / Disable switch — and the next press turns it back on at 20 %. The Box remembers both the on/off state and the gain across a reboot.
Factory defaults: User Defined 1 (left, 3rd button) is set to SPKVOL, User Defined 2 (right, 4th button) is set to SIDETONEVOL. Each press is acknowledged with a short sidetone pip. When headphones are plugged in and the audio route is set to AUTO, the speaker is additionally engaged for SPKONOFF / SPKVOL presses so the change is audible (restore default behaviour with AUDIO:ROUTE:AUTO).
Log Tab
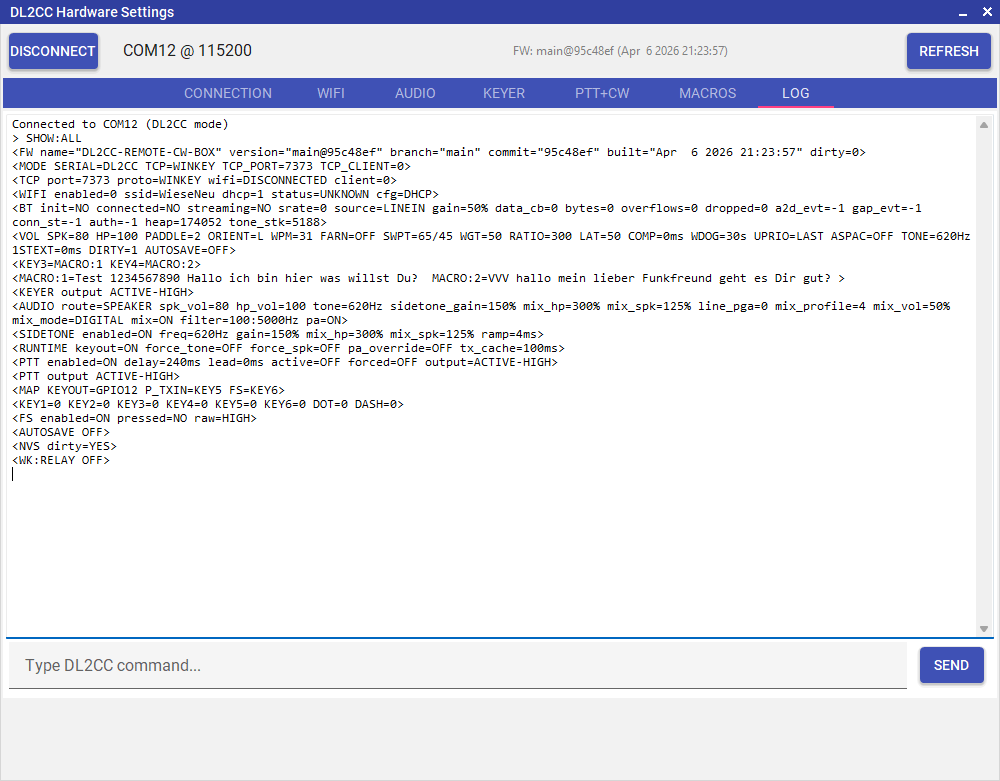
Log tab — command history and Box diagnostic messages
Shows a live log of commands sent to the Box and responses received. Useful for diagnosing connection issues or verifying that settings were applied correctly.
Settings Persistence
All Box settings — WPM, keyer mode, volumes, sidetone frequency, PTT timing, WiFi credentials, and macro content — are stored in non-volatile flash memory on the ESP32. Settings survive power cycling. Settings are automatically saved 30 seconds after a detected change; a manual save option is also available in Hardware Settings.